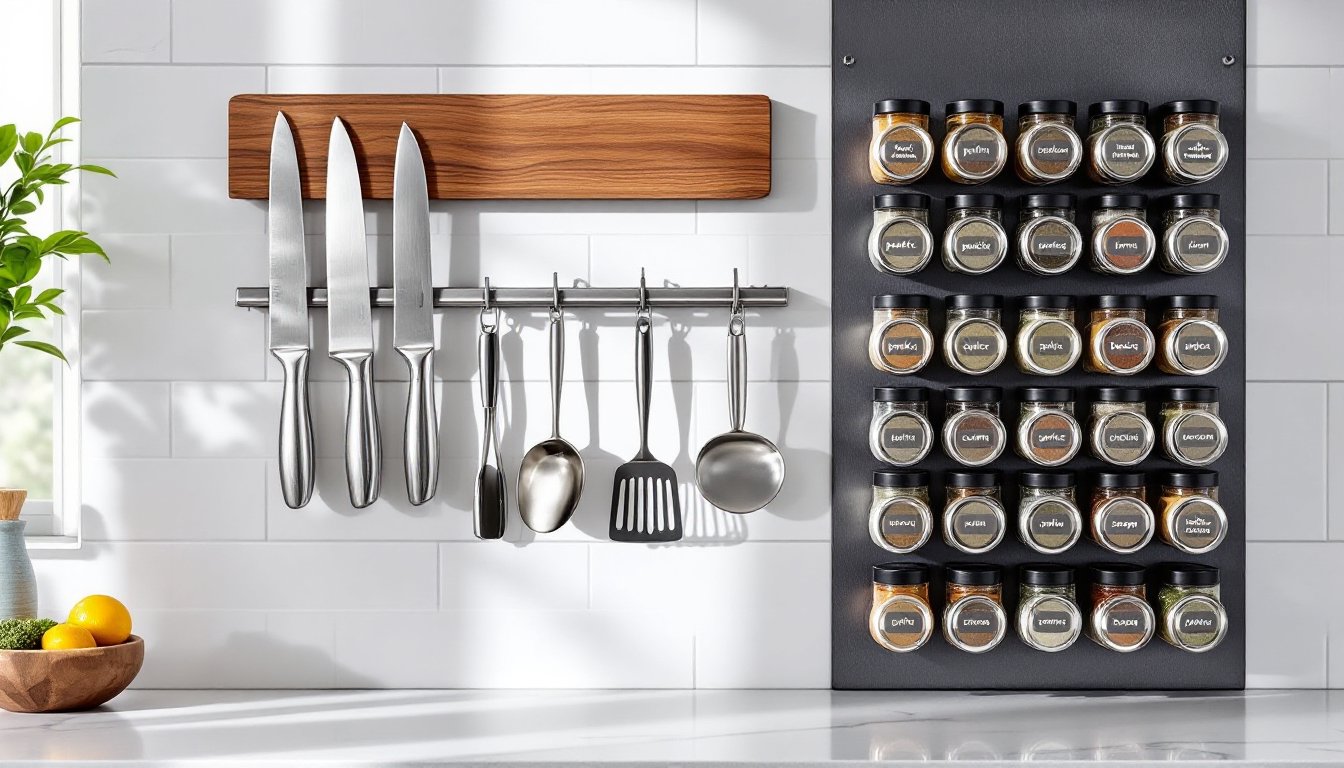
Kitchen clutter has met its match. Magnetic storage systems have evolved from simple knife strips into comprehensive organizational solutions that free up drawer space, clear countertops, and put frequently used tools within arm’s reach. Unlike bulky shelving units or overloaded drawers, magnetic systems mount directly to walls, backsplashes, and even the sides of appliances, transforming vertical surfaces into functional storage zones. For homeowners working with tight galley kitchens or simply looking to streamline their cooking workflow, magnetic storage delivers immediate impact without demolition or permanent alterations to cabinetry.
Table of Contents
ToggleKey Takeaways
- Magnetic kitchen storage mounts directly to walls and vertical surfaces, eliminating drawer clutter and freeing up valuable counter space without permanent alterations to cabinetry.
- Test tool compatibility first: 400-series stainless steel knives stick firmly to magnets, while 300-series stainless steel may not adhere at all.
- Mount all magnetic strips and bars using at least two screws anchored into wall studs or solid backing; adhesive alone can fail under load in humid kitchen environments.
- Magnetic knife strips (16–18 inches) and neodymium tool bars provide superior holding power and safety compared to traditional knife blocks or utensil crocks.
- Organize magnetic storage by task zones—hang cutting tools near prep areas and cooking utensils near the range—to minimize cross-kitchen trips and streamline meal preparation.
- Store spices away from direct heat and sunlight on magnetic racks to preserve potency; mount them on perpendicular walls or inside pantry doors rather than next to the range.
Why Magnetic Storage Is a Game-Changer for Modern Kitchens
Magnetic storage offers three core advantages: reclaimed drawer space, instant accessibility, and non-invasive installation. Traditional knife blocks consume 8–12 inches of prime counter real estate, while utensil crocks take up even more. Mounting a magnetic strip or panel clears those surfaces immediately.
From a safety standpoint, magnetic knife storage keeps blades visible and separated, reducing the risk of reaching into a cluttered drawer and getting cut. This visibility also helps users spot dull edges that need sharpening.
Installation is straightforward on most surfaces. Magnetic strips typically mount with wood screws into studs or with heavy-duty adhesive on tile backsplashes. No electrical work, no plumbing reroutes, just measure, level, drill (or stick), and hang.
One consideration: magnetic systems work best with ferrous metals (iron, steel). Stainless steel knives and tools vary in magnetic responsiveness depending on their alloy. 400-series stainless (magnetic) holds firmly: 300-series stainless (non-magnetic austenitic) may not adhere at all. Test your tools before committing to a full magnetic overhaul.
Best Magnetic Storage Solutions for Kitchen Knives and Utensils
Magnetic knife strips remain the most popular entry point. Standard lengths run 12, 16, 18, and 24 inches, with the 18-inch size holding five to seven knives comfortably. Look for strips with a wood or bamboo face, they’re gentler on blade edges than bare metal or plastic-coated versions.
For utensils, magnetic tool bars with embedded rare-earth magnets (neodymium) provide stronger hold than ceramic ferrite magnets. This matters when hanging heavier items like ladles, scissors, or meat tenderizers. A 16-inch neodymium bar can support up to 15–20 pounds depending on the manufacturer’s rating.
Some systems feature modular magnetic panels, flat metal sheets that mount flush to the wall, offering flexible placement. Users can hang utensils, small pots, or even magnetic measuring cups anywhere on the panel. These panels typically come in stainless steel or powder-coated finishes and range from 12×12 inches to 24×36 inches.
Safety reminder: Mount all magnetic strips and bars with at least two screws into wall studs or solid backing. Adhesive alone may fail under load, especially in humid kitchen environments. If mounting to tile or drywall without stud access, use toggle bolts rated for the combined weight of the strip plus tools.
Magnetic Spice Racks and Container Systems
Magnetic spice storage has surged in popularity thanks to compact tins with clear lids that stick directly to metal surfaces. Standard tins measure 2.5–3 inches in diameter and hold about 2–4 ounces of dried spices. Arrange them on the side of a refrigerator, a steel backsplash panel, or inside a cabinet door lined with a steel sheet.
For a cleaner look, some manufacturers offer hexagonal or square tins that tessellate without gaps, maximizing surface coverage. Label the lids with a label maker or chalkboard paint for easy identification.
If the refrigerator isn’t an option, or the aesthetic doesn’t fit, install a magnetic backer board on an open wall near the stove. A 16×20-inch galvanized steel sheet screwed into studs provides ample real estate for 20–30 spice tins. Paint the steel with heat-resistant enamel to match kitchen colors.
Alternatively, consider magnetic storage upgrades that incorporate pull-down racks. These systems mount under upper cabinets and swing down for access, keeping spices out of sight when not in use.
Pro tip: Store spices away from direct heat and sunlight to preserve potency. Even though magnetic spice racks look great next to the range, prolonged heat exposure degrades flavor compounds. Mount them on a perpendicular wall or inside a pantry door instead.
DIY Magnetic Storage Projects You Can Build This Weekend
Building a custom magnetic panel takes minimal tools and materials. Here’s a straightforward project:
Materials:
- One 24×36-inch galvanized steel sheet (20-gauge or heavier)
- Four wood screws (1.5-inch, pan head)
- Toggle bolts if mounting to drywall without studs
- Spray paint or powder coat (optional)
- Level, drill, stud finder
Steps:
- Locate studs along the target wall with a stud finder. Mark at least two stud centers.
- Prep the steel sheet: Wipe down with denatured alcohol. If painting, apply metal primer followed by two coats of enamel. Let cure 24 hours.
- Drill mounting holes in each corner of the sheet, about 1 inch from the edges.
- Position and level the sheet against the wall, marking screw locations through the holes.
- Drill pilot holes into studs (or install toggle bolts in drywall).
- Mount the panel with screws, tightening evenly to prevent warping.
Another weekend project: magnetic knife block. Purchase a 4×4×10-inch block of hardwood (maple or walnut). Drill a series of 1-inch-deep holes in a grid pattern on one face, spacing them about 1.5 inches apart. Press neodymium disc magnets (½-inch diameter, ⅛-inch thick) into each hole with wood glue. Sand, finish with mineral oil, and you’ve got a countertop magnetic holder that looks like traditional wood but offers stronger retention.
Safety note: Wear safety goggles when drilling metal or wood. Use work gloves when handling sheet metal, edges are sharp even after deburring.
Installation Tips for Different Kitchen Surfaces
Drywall: Always anchor into studs for magnetic strips holding knives or utensils. If studs aren’t positioned where you need them, use heavy-duty toggle bolts rated for at least twice the anticipated load. Standard drywall anchors will pull out under repeated use.
Tile backsplash: Adhesive-backed magnetic strips work well on smooth, non-porous tile. Clean the surface with isopropyl alcohol, let dry, then press the strip firmly for 30 seconds. Wait 24 hours before hanging tools to allow the adhesive to cure. For heavier loads, drill through grout lines (not tiles) with a carbide-tipped masonry bit and use plastic anchors with screws.
Wood cabinets: Screw directly into cabinet sides or undersides. Pre-drill with a bit slightly narrower than the screw shank to prevent splitting. ¾-inch screws work for most strips: avoid screws longer than the cabinet thickness to prevent poking through the interior.
Stainless steel appliances: Magnetic strips and spice tins adhere directly, no hardware needed. Test first: some stainless finishes are non-magnetic. Avoid placing heavy items on appliance doors, as repeated stress can loosen hinges over time.
Plaster walls: Older plaster over wood lath can be tricky. Locate lath strips (typically ¾ inch wide, spaced 3–4 inches apart) with a stud finder set to ‘deep scan’ mode. Drill carefully to avoid cracking plaster: use a screw-in drywall anchor if lath positioning doesn’t align.
Organization experts featured on home design platforms often recommend marking stud locations with painter’s tape before mounting, especially when installing multiple strips in a row.
Maximizing Small Kitchen Spaces with Magnetic Organization
In compact kitchens, vertical surfaces are underutilized gold. The side panel of a refrigerator, the narrow gap between the stove and countertop, and the inside of cabinet doors all become functional zones with magnetic systems.
Start by auditing what’s currently in drawers. Utensils, knives, scissors, measuring spoons, and can openers are prime candidates for magnetic hanging. Removing these items can free up an entire drawer for less-frequently-used gadgets or pantry overflow.
For renters or those avoiding wall penetrations, freestanding magnetic boards lean against backsplashes or mount with removable adhesive strips rated for the weight. These systems won’t hold as much as screw-mounted options, but they’re perfect for lightweight tools and spice tins.
Layer magnetic storage with other compact kitchen strategies like under-shelf baskets and pull-out organizers. Magnetic strips excel at keeping high-use items visible and within reach, while enclosed storage handles bulk and backup supplies.
Pro tip from organization authorities: Group magnetic tools by task. Hang all cutting tools (knives, shears, peeler) on one strip near the prep area. Place cooking utensils (tongs, spatula, ladle) on another strip near the range. This zoning reduces cross-kitchen trips and speeds up meal prep.
Consider adding a magnetic strip inside a pantry door for frequently grabbed items like bag clips, twist ties, or even a small flashlight. The cumulative effect of multiple small magnetic zones is a kitchen that feels significantly more spacious and efficient.
Conclusion
Magnetic storage transforms kitchens by reclaiming space, improving tool accessibility, and streamlining workflow, all with minimal installation effort. Whether mounting a simple knife strip or building a custom magnetic panel, these systems adapt to any kitchen size and layout. Test tool compatibility, anchor securely into studs or solid backing, and arrange items by task zone. The result is a cleaner, more functional kitchen ready for years of daily use.